Following is a step by step guide in creating your first "Hello World" Android application.It was created with the following setup:

Now you have your project created let's write some code! Your code is located in a file called HelloWorld.java in the src folder. Your screen layout file is main.xml in the layout directory.
 Let's take a look at the main.xml (layout) file. Open main.xml. You should now see it in "Layout" mode like this...

and if you select "main.xml" you can view/edit the xml markup
 Let's remove the default textview to cleanup our display
 Drag a button on to layout
 View/edit the XML by clicking on "main.xml"
Now we have a button let's make something happen when the button is pressed.
Now let's run our new application.


 NOTE: If you receive an error try the following:
Complete source for project
HelloWorld.java
main.xml
- Windows (I happen to be using Windows 7, but any flavor of windows will do)
- Eclipse IDE for Java Developers (v3.5 Galileo)
- Java Platform (JDK 6 Update 18)
- Android SDK Tools, Revision 4
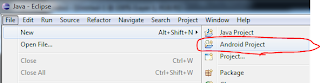
- Create a new Android project (File > New > Android Application)

- Set your project properties
- Project Name: Hello World
- Build Target: Select Android 2.1
- Application Name: Hello World
- Package Name: com.android.test
- Create Activity: HelloWorld
- Press "Finish"

Now you have your project created let's write some code! Your code is located in a file called HelloWorld.java in the src folder. Your screen layout file is main.xml in the layout directory.


and if you select "main.xml" you can view/edit the xml markup

- Return to "Layout" mode
- Right click on "Hellow World, HelloWorld!" TextView and select "Remove"


- Change android:text="@+id/Button01" to android:text="Click Me"
- Save your changes
1 2 3 4 5 6 7 8 9 | <?xml version="1.0" encoding="utf-8"?> android:orientation="vertical" android:layout_width="fill_parent" android:layout_height="fill_parent" > <button android:text="Click Me" android:id="@+id/Button01" android:layout_width="wrap_content" android:layout_height="wrap_content"></Button> </LinearLayout> |
- Open "HelloWorld.java" file. There is already code for when the class is created that set's the content view.
1 2 3 4 5 | @Override public void onCreate(Bundle savedInstanceState) { super.onCreate(savedInstanceState); setContentView(R.layout.main); } |
- Add the highlighted code on line #5. Create a button object and reference the button we placed on our layout. After you add the following line of code you will get an error. This is because you need to import "android.widget.Button". The fastest way to import is the hotkey Ctrl-SHIFT-O. This will add all missing imports.
1 2 3 4 5 6 | @Override public void onCreate(Bundle savedInstanceState) { super.onCreate(savedInstanceState); setContentView(R.layout.main); Button button = (Button) findViewById(R.id.Button01); } |
- Register a callback to be invoked when this button is clicked. Add the highlighted code in lines #6-#10.
1 2 3 4 5 6 7 8 9 10 11 | @Override public void onCreate(Bundle savedInstanceState) { super.onCreate(savedInstanceState); setContentView(R.layout.main); Button button = (Button) findViewById(R.id.Button01); button.setOnClickListener(new OnClickListener() { @Override public void onClick(View v) { } }); } |
- Now let's add some code in the method "OnClick" to pop up a message when the button is clicked. Add the highlighted code on line #9.
1 2 3 4 5 6 7 8 9 10 11 12 | @Override public void onCreate(Bundle savedInstanceState) { super.onCreate(savedInstanceState); setContentView(R.layout.main); Button button = (Button) findViewById(R.id.Button01); button.setOnClickListener(new OnClickListener() { @Override public void onClick(View v) { Toast.makeText(HelloWorld.this, "Hello World", Toast.LENGTH_SHORT).show(); } }); } |
Now let's run our new application.
- Select "Run > Run"

- You will get a dialog "Run As". Select "Android Application"

You may receive "Android AVD Error" if you have not setup an android emulator device.

- Select yes to setup a new Android Virtual Device
- Select "New"

- Create the following new Android Virtual Device
- Name: Android2.1
- Target: Android 2.1 API Level 7
- SD card Size: 4000 MiB
- Leave the rest at the default settings

- Press "Create AVD". Be patient it will take a minute to create your new AVD.
- Select your new AVD and run your application.

- Try removing "@Override" on line 18.
- change line 15 from "setContentView(R.layout.main);" to "this.setContentView(R.layout.main);"
Complete source for project
HelloWorld.java
1 2 3 4 5 6 7 8 9 10 11 12 13 14 15 16 17 18 19 20 21 22 23 24 | package com.android.test; import android.app.Activity; import android.os.Bundle; import android.view.View; import android.view.View.OnClickListener; import android.widget.Button; import android.widget.Toast; public class HelloWorld extends Activity { /** Called when the activity is first created. */ @Override public void onCreate(Bundle savedInstanceState) { super.onCreate(savedInstanceState); setContentView(R.layout.main); Button button = (Button) findViewById(R.id.Button01); button.setOnClickListener(new OnClickListener() { @Override public void onClick(View v) { Toast.makeText(HelloWorld.this, "Hello World", Toast.LENGTH_SHORT).show(); } }); } } |
main.xml
1 2 3 4 5 6 7 8 9 10 11 | <?xml version="1.0" encoding="utf-8"?> android:orientation="vertical" android:layout_width="fill_parent" android:layout_height="fill_parent" > <button android:text="Click Me" android:id="@+id/Button01" android:layout_width="wrap_content" android:layout_height="wrap_content"></Button> </LinearLayout> |
No comments:
Post a Comment